
A free crochet duck pattern is one of the friendliest ways into amigurumi, the Japanese craft of crocheting small stuffed creatures that’s grown into a genuinely popular corner of modern crochet. A duck’s shape is forgiving by design: a round body, a slightly smaller round head, two flat wings, a simple beak, and small feet. None of those pieces asks for the kind of precise shaping a garment or a fitted accessory needs, which makes this a good project if you’ve mastered basic stitches but haven’t tackled a three-dimensional shape yet.
That said, amigurumi has its own quirks plain flat crochet doesn’t. Stuffing needs to go in evenly so the duck doesn’t end up lumpy, and safety eyes need real thought if the finished toy is going anywhere near a young child. This post walks through a complete free crochet duck pattern, the materials that make amigurumi easier to work with, and where a first attempt tends to go wrong.
Table of Contents

What an Easy Free Crochet Duck Pattern Actually Needs?
Worsted weight yarn is the standard choice for amigurumi, mostly because it’s easy to see your stitches clearly while learning to shape a sphere, and it holds up well to the handling a stuffed toy gets over time. Cotton or a cotton-acrylic blend gives cleaner stitch definition than a fuzzier yarn, which matters more here than in most crochet since the smooth surface is part of the finished look.
Hook size works a little differently for amigurumi than for most other crochet. You’ll want to size down more than you might expect — a smaller hook than the yarn label recommends creates a tight, dense fabric that keeps the stuffing from peeking through between stitches, which is a bigger concern here than gauge accuracy in the usual sense.
Polyester fiberfill is the standard stuffing choice, since it’s washable, holds its shape, and doesn’t compress permanently the way some natural stuffing materials can. Buy more than you think you’ll need — underestimating stuffing is one of the more common reasons a finished duck ends up soft and floppy instead of properly round.
On eyes specifically: plastic safety eyes give the cleanest, most polished look, but they carry a real choking risk if a young child manages to work one loose, so CPSC guidance on small parts and choking hazards is worth reading if this duck is meant for a child under three. Embroidered eyes, worked directly into the yarn with a needle, take a bit more effort but remove that risk entirely, which makes them the safer choice for the youngest recipients.
Free Crochet Duck Pattern Ideas: Two Ways to Build It
There’s more than one reasonable way to put a duck together, and the choice affects both difficulty and how the finished piece looks.
Worked in separate pieces, then assembled. Body, head, wings, and beak are each crocheted on their own and sewn together once finished. This gives you more control over positioning — you can adjust exactly where the head sits or how the wings angle before committing to a permanent stitch — which makes it the easier method to fix mistakes on.
Worked as one continuous piece with minimal seaming. The body and head are crocheted as a single connected shape, with only the smaller pieces like wings and a beak added separately. This gives a cleaner silhouette with no visible join at the neck, but it takes more planning up front, since you can’t easily reposition the head once it’s already part of the same piece as the body.
For a first free crochet duck pattern, separate pieces are the more forgiving route. Being able to lay everything out and adjust placement before sewing is worth more than the slightly cleaner look of a one-piece build, especially while you’re still getting comfortable with amigurumi shaping generally.
Sizing Guide for a Free Crochet Duck Pattern
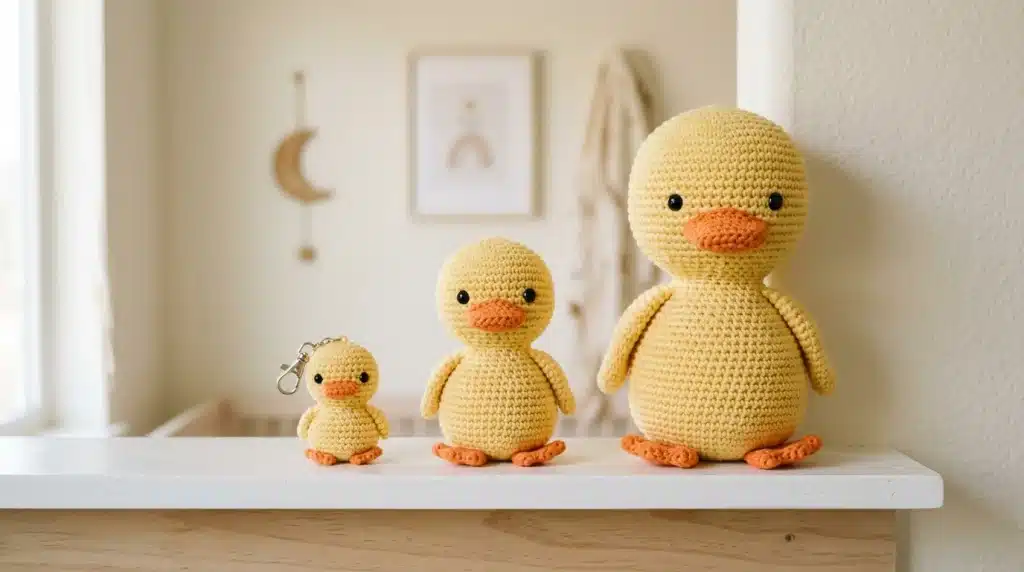
Amigurumi sizing depends mostly on yarn weight and hook size rather than a fixed measurement chart the way a garment would use, since the whole shape scales up or down together as those two things change.
| Size | Approximate Height | Typical Use |
|---|---|---|
| Mini/Keychain | 2–3 in | Bag charm, keychain |
| Standard | 5–6 in | Shelf decor, small gift |
| Large/Huggable | 8–10 in | Baby-safe plush, nursery decor |
A larger duck, worked in the same worsted weight yarn with a bigger hook, simply uses fewer, larger stitches to cover the same shape. Scaling down to a mini or keychain size usually calls for a finer yarn and a smaller hook rather than just fewer rounds, since amigurumi shaping depends on a specific stitch density to look right at any size.
How to Make a Free Crochet Duck Pattern: Step-by-Step Construction
This covers the separate-pieces method, since it’s the friendlier build for a first amigurumi project. The round-by-round shaping below follows standard amigurumi increase logic, which scales consistently regardless of your exact yarn or hook, so you can use these numbers directly rather than treating them as a rough guide.
Step 1: Start the body. Magic ring, 6 single crochet into the ring. Round 2: 2 sc in each stitch (12 st). Round 3: 2 sc in next st, sc in next st around (18 st). Round 4: 2 sc in next st, sc in next 2 st around (24 st). Continue increasing this way for one or two more rounds depending on your target size, then work even rounds with no increases until the body reaches your desired height.
Step 2: Begin closing the body. Reverse the increase pattern into a decrease pattern — sc2tog, sc in next 2 st around, then continue decreasing every round until a small opening remains at the top.
Step 3: Stuff the body. Add fiberfill through the opening, working it in evenly with your fingers or a blunt tool so it’s firm but not overstuffed, before closing the last few stitches.

Step 4: Make the head. Work the same magic-ring-and-increase sequence as the body, but stop at a smaller total stitch count, since the head should read as noticeably smaller than the body on a well-proportioned duck.
Step 5: Attach the head. Stuff the head the same way as the body, then sew it securely to the top of the body, checking the angle from multiple sides before finishing the stitches, since a head sewn even slightly crooked is very noticeable on a finished amigurumi.
Step 6: Add the beak and eyes. If using safety eyes, insert and secure them before the head is fully stuffed and closed, since they need to be attached from the inside. Work or attach a small flat beak piece just below the eye placement.
Step 7: Add the wings and feet. Two small flat wing pieces, sewn to either side of the body, and two simple oval feet pieces, sewn to the bottom, finish the shape. Position both symmetrically by checking placement against the body’s center seam before stitching them down permanently.
Common Mistakes in a Free Crochet Duck Pattern
The finished duck looks lumpy instead of smoothly round. This almost always means the stuffing went in unevenly. Add fiberfill in small amounts throughout the process rather than stuffing everything in at the very end, and check for firm, even coverage by gently squeezing the piece from multiple sides.
The head looks too large or too small for the body. This comes down to the two pieces not being proportioned against each other before starting. Decide on your head-to-body stitch count ratio before beginning either piece, rather than adjusting one after the other is already finished.
Wings or feet end up uneven or crooked. This happens when pieces are sewn on one at a time without checking them against each other first. Pin or loosely position both pieces before permanently stitching either one down, so you can compare their placement side by side.
Visible gaps show the stuffing underneath. Usually the hook was too large for the yarn weight, leaving loose stitches. Sizing down the hook, even below what feels natural, tightens the fabric enough to hide the stuffing properly.
Free Crochet Duck Pattern Tips for a Cleaner Finish
Weave in ends as you go rather than saving them for the very end, so loose tails don’t get accidentally sewn into a seam or trapped under stuffing where they’re hard to fix later.
A stitch marker to track the start of each round matters more here than in most crochet, since tight, dense stitching makes it easy to lose your place during long stretches of even rounds with no shaping to orient you.
A light final block, or careful reshaping by hand while the stuffing settles, helps the duck hold a smoother, rounder shape than it might right off the hook.
FAQs
Is amigurumi harder than regular crochet, or just different?
Mostly just different. The stitches are usually basic single crochet worked in tight, continuous spirals — the real skill is shaping a three-dimensional form and stuffing it evenly, not the individual stitches.
Can I make this duck without safety eyes at all?
Yes, and for a very young child it’s often the safer choice. Embroidered eyes give up some of the polished look of plastic safety eyes but remove any small-part choking risk entirely.
Why does my duck’s body look more oval than round?
Usually the increase rounds stopped a little early or late relative to how many even rounds followed. A true sphere needs roughly as many even rounds as the diameter created by the increases.
How much yarn does a standard-size amigurumi duck actually need?
This varies by exact size and yarn weight, so there’s no single reliable number to hand over without those specifics. A small ball of worsted weight yarn, well under a full skein, comfortably covers a standard 5 to 6 inch duck.
Can I turn this same construction into a different animal?
Yes — the body-and-head sphere construction here is the basis for a huge range of amigurumi animals. What changes is mostly the ears, snout shape, and color choices, not the fundamental round-shaping technique.

Leave a Reply